
It's how us creative types try to feel all worldly and crap.
:p
I found a couple tutorials online on how to make your own mini plein air kit, so I thought I'd give it a shot.
Start with an altoids box (or that approximate size) and a block of white sculpting clay. Get the brand that you can bake in your home oven. (Fimo, sculpty, etc). You'll also need some glue and a can of white spray paint
This altoid tin is really a blank I bought years ago to do something crafty with and never did it apparently. I think I was going to use it for a scrapbook.
Didn't happen.
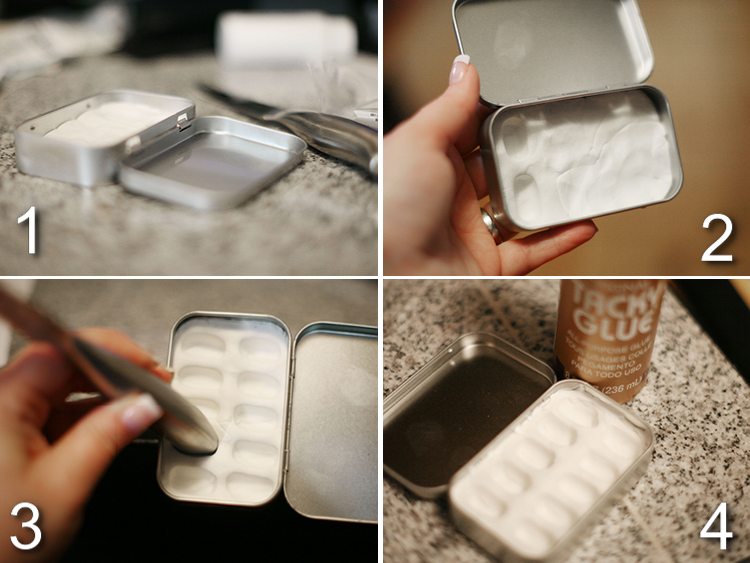
1. Normal people would probably spray paint first, but I ws anxious to get started so I just opened the fimo, worked it until it was soft and pressed it evenly in the bottom.
2. You can see where I'm starting to make some wells for my paints.
3. I used the handle of one of my steak knives to make my wells because it was about the right size, flat on the end and "retangle-ish". After you do all the rows, you will probably have to come back and do them again and and again as the fimo will displace and distort the other wells as you go along. Just keep working it until you get them all even without a lot of distortion around the edges.
4. Bake the fimo in the oven according to the directions. I believe I baked my for 20 minutes. After it cooled, I could see that it shrank slightly from the baking process so I used a little tacky glue as kind of "caulking" around the edges. I didn't want water to get under it and cause rust.

You can add paints now if you like but if you haven't spray painted it yet, don't be like me and do it now. Cover the well area and spraypaint the lid white. You want it white so you can see if your colors are mixed to the shade you want.
Once your paint is dry, add your paints. Leave the top open until they are dry. You've just created a traveling holder with 10 pans of paint! (you can tell which are my cheap ones and which are the expensive ones lol)
Now I can just drop it in my purse and go. I have this brush in my purse all the time. I keep a little waterbucket in my glove box (which is a single serving ice cream container) so if the urge ever strikes, I can paint when I wish.
You can make these even smaller if you like. It's almost a contest to see who can make the smallest travel set. I saw one that fit in the cap of a water bottle - and worked!
This isn't a 100% true "trash to treasure" because it was all new materials, but find yourself some altoids (who can resist those tins?) and make your own!


No comments:
Post a Comment