
I wanted to add a little extra kick to my kitchen. The cabinets are basic cabinetry, that we painted after we realized that we didn't have anything even close to "high end" when we moved in. The counters came last year, which are salt and pepper granite tiles we installed ourselves. Our island is a repurposed antique dresser (also with a granite top). All our appliances are stainless. We felt like the backsplash was just a little bit...
boring.
SO! I got a brilliant idea (this is where my husband cringes). I wanted a pressed tin backsplash, which is much easier than you might think it is!
I started out by measuring several times, and figuring out that I needed approximately four 2'x2' pressed tin panels. I bought 5 online (amazon - search for "M-BOSS") "just in case" I messed up one. They were reasonable priced, and with shipping I paid around $60.
I then bought 2 cans of krylon hammered copper spray paint. I didn't do anything fancy to prime the panels (they are raw steel), I just started spray painting, it ended up taking approximately 1.75 cans and 2-3 coats each.
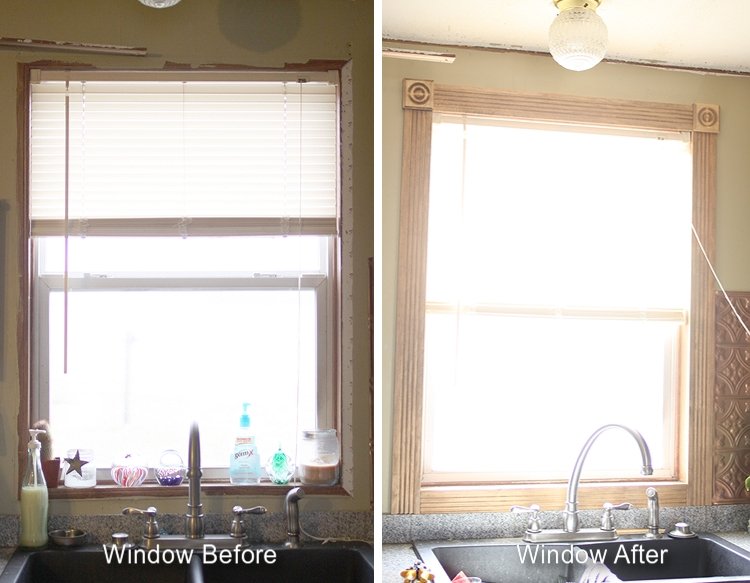
After I started installing it, I realized that the window trim really needed to be replaced first, so I ripped off all the cheap crap that was there before (above) and Gene helped me replace it with a nice pine trim that I stained with the leftover stain we used on our floor. It was quick and only took us about 1/2 hour.
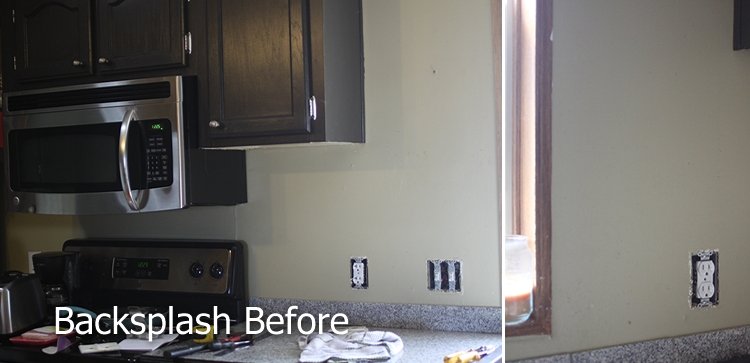
As you can see, the "before" wall is pretty boring. It was just painted green, like most of the rest of our kitchen/house. I love the color, but we just needed something a little bit "more".
Cutting out the tin was the hardest part. I very carefully measured (3 times!!) each cut and would dry fit repeatedly until it fit into the space perfectly. Like most houses, things are not perfectly straight, so I had to be very careful not to have big gaps, once you cut the tin, there's no gluing it back together!
After I would dry fit for the space, then I would measure for the outlets which was the hardest (and scariest) part.
This is where I confess that I shocked myself once.
oops.
Remember to shut off the electric at the breaker box. heh.
(finally, I can hear out of my left ear again hallelujah!!) ;)
Once everything fits perfectly, I used power grab construction adhesive and put a modest amount on the back of the tin and squished it into place. Do NOT put too much (Gene!) as it will squish out the sides, and you'll get it all underneath your acrylic nails. This is when you'll get really irritated at your husband and use up the last paper towel you own.
Not that I speak from experience or anything.
Put your outlet covers back on and stand back to enjoy.
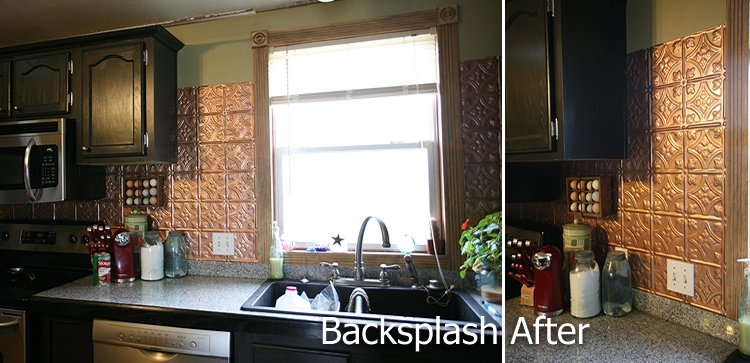
Yes, it really was THAT easy.
We still need to put some silicone caulking along the edge of the top of the granite to keep out any wetness. The trim around the window is also going to need a couple coats of varnish, and a small window sill installed (tomorrow!)
This project was very inexpensive - around $100 for about 10' of counter.
$60.00 - Pressed tin
$12.00 - 2 cans of paint
$7.00 - 2 tubes of power grab
$23.00 - window trim
$9.00 - window sill
$2.30 - 2 fancy window corners
$113.30 - total!
If I'd had someone else do this for me, It would have easily been hundreds of dollars! Sweat equity!
You can do it!
Share your links to your kitchen makeovers.


8 comments:
I really like how that turned out. Love copper. Good job and it looks really vintage.
Love it! I should have checked out Amazon. I have some faux embossed tin panels (from Lowes - pricey $$$) sitting, waiting on me to install. Ok, for months now ;) I think you've just inspired me to move forward. Thanks for sharing - it looks amazing. -Tammy
Gorgeous! I love it! I've been wanting to spice up our kitchen with something like that.
That's exactly what I want to do with our backsplash! It looks really great! Did you get it at Lowes? That's where I've been looking at it.
Ooops, sorry, I missed that you bought them from Amazon. They are much pricier at Lowes! It looks awesome!
I'm totally jealous of how it turned out. It looks amazing
Gorgeous!
That's a kitchen I would LOVE cooking in!
Post a Comment