
Some of the photos I seem most disappointed in every winter, are photos of snow. No matter how hard I would try for years, the outcome would be muddy and gray photos that really didn't reflect what I was actually seeing.
Why is this happening!?
Well, the answer is simple. The snow is so white, and so bright, that it's tricking the camera's meter into thinking that it's getting a lot of light and therefore underexposes the image to compensate.
Tricky camera!
There are a couple ways to try to fix this problem.
Option#1:
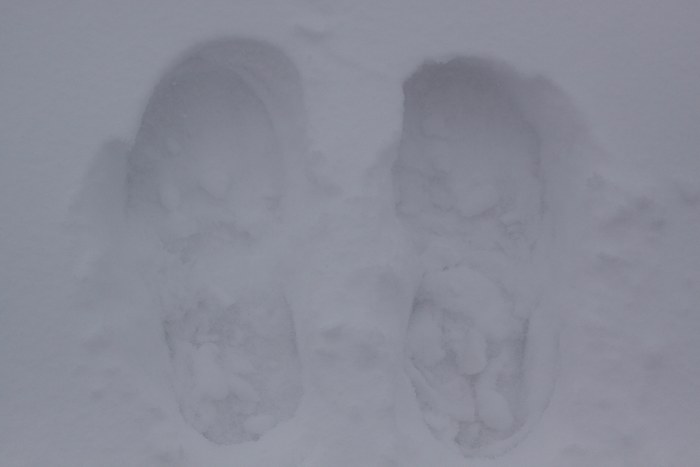
You get home from your weekend in Aspen at the lodge (happens to me all the time) and realize all your photos look like the one above. Pretty crappy. 90% of ppl will toss this photo and be annoyed they paid .29 for a 4x6 that's going in the trash can.
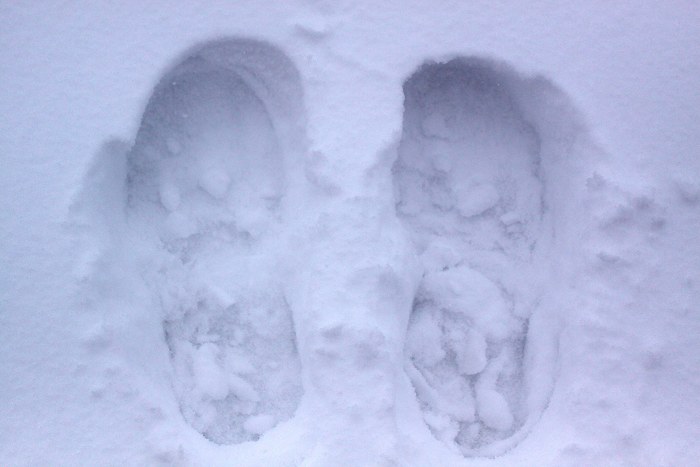
Here's how to fix the problem if it's ALREADY happened (before you print btw)... I took this photo last winter and wanted to kind of show how deep the snow was. BTW, there was a lot last year. I'm glad we're looking at a mild winter so far.
So anyway, I pulled the image into photoshop adjusted the levels by moving the sliders....
Example:
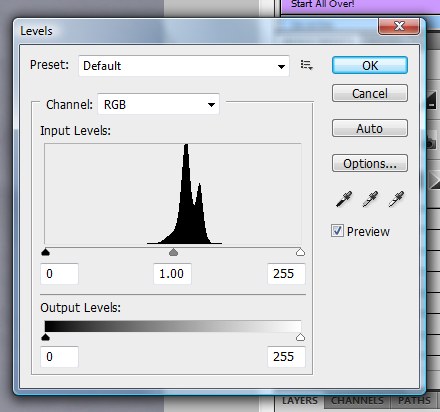
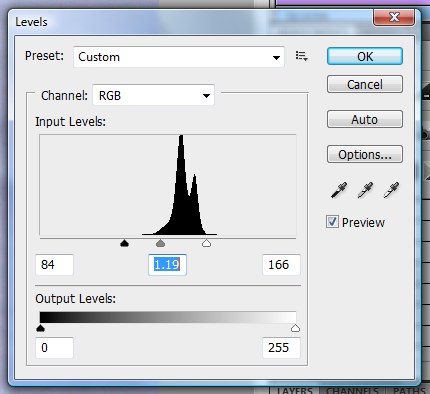
Carefully play with these levels until you get the right amount of dark and light to create enough contrast in your image. Not enough, and the image is too dark, too much, and the image blows out and loses details.
Voila!
aka this is why God made photoshop.
You can now see how I "saw" the image in my head. I might actually play with it a little more, as it still feels a little on the dark side, but I didn't want to blow out the texture of the snow. As you can see, I left the blue cast to it, but that's a personal choice. I like snow having that "blue" look to it, it makes it look colder in my opinion. Again, you can remove some of this color yourself.
If you don't have photoshop, do not sweat it! I know, it's an expensive program. There's cheaper options like Paint shop Pro (which is awesome), and there's a free option called Gimp. But whatever you do, please don't edit your photos in picnik..... it's just *bad* and they look crappy.
Option #2 is Exposure Compensation
This option is for those people that think ahead, unlike myself. So before you hit the slopes, think ahead about what your scene will look like. Lots of white snow. Lots.
Your camera meter measures the light in a scene and tries to evaluate the average of all the tones. Again, all that snow is very white and very bright and tricks the camera into thinking that too much light is coming in so we must underexpose the image to get the "proper exposure".
Your DSLR may have modes like center weighted average or spot metering which try to compensate for issues like this, but sometimes even that is not good enough for the camera. You will need to manually "trick" it into exposing properly.
This is called exposure compesation and your camera will probably have a simliar display like below where you can ask your camera to underexpose (make it darker) or overexpose (make it lighter) by 1/3rd stop intervals. My canon, lets you under/over expose by 2 full stops either direction.
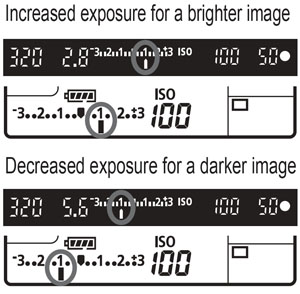
To expose the snow, try pushing your slider to the right and increase your exposure. Experiment, but you will probably be in the +1-+2 full stop range. Each dot between the numbers indicates 1/3 of a stop, so if 2 seems to much, and 1 is to little, try 1.3 and see what happens. Do not depend solely on your lcd screen. I find that if mine seems properly exposed, that often times it's a little on the dark side when I get home.
Also, don't go too crazy with this method because your images will be over exposed. You can always add a little light, but once the details are blown out, they can never be recovered. Also keep in mind that you can use this method for more than just snow. I often times find that if I'm trying to shoot up into the sky (at birds, or such) that they are often over exposed.
Don't forget to put the exposure back to the middle when you get home, or you'll end up with a bunch of over/under exposed images.

{This image was taken last night, as it snowed, looking up at the street light in our yard.
The starburst came from a snowflake that landed on my lens.}
The same way that over exposure works, under exposure works too. So if you're taking an evening shot, and the camera is trying to overexpose it to compensate for the lack of light, you can turn down your exposure compensation to -1 to -2 stops, whatever works best for your scene.
Which do I prefer?
Well, thinking about it now, I think I personally prefer option #1. Mainly for 2 reasons, first, I don't remember to set it when I'm out in the field and like I said, my images tend to look lighter on my lcd screen so I think I'm ok. Secondly, by being underexposed a bit, I don't lose that much detail. When I overexpose, I do it up right and tend to blow things out. I would rather gently pull it up in the computer.
What if I have a point and shoot?
Well, again, read your manual! You may have a mode specifically for snow. Manufactures know this is a problem so they are trying to compensate to make photography easier for you! You may also have a meter in your camera, but that is much less likely. If you have neither, then all is not lost, work on cleaning up those photos when you get home.
Other Winter photo tips:
- Be prepared for cold weather. This means if you're in your back yard, wear gloves and don't stay out too long. Thin warm gloves are best. You won't be able to operate your camera with big thick mittens. You'll take them off and your hands will get colder faster - and run the risk of frostbite which happens quickly.
- If you're going snowshoeing, then talk to the outdoorsy snowshoe people about what you need to get where you're going so we don't have to dig out your frozen corpse out of a snowbank.. ok?
- If you're walking straight outside from the house to shoot, your lens is going to fog up. Please give it some time to cool down and don't rub your lenses as you might scratch them, and honestly it won't help a darn bit anyway.
- Keep your batteries warm. Digital camera batteries (well, all batteries) go dead faster when they are cold. Keep a set in your pocket next to your body to keep them warm.
- Keep your camera protected if you're shooting in the snow, especially a wet snow. This can be as simple ans tearing a hole in a grocery sack for your lens to fit through. Water+electronics=Bad Juju
I know a million photographers out there might disagree with me, and that's ok, I still think you're awesome and probably pretty cute too. I'm only sharing here how *I* do things and what works for me. If you have any other methods, by all means please share! Links are cool, bad attitudes are not!


3 comments:
Hahaha! I LOVE picnik........guess that's why I'm not a pro ;)
LOL goodwife!
OK, but as long as you SWEAR you won't use weird freaky colors, white vignettes and putt crappy text all over your photos. If you can promise that, then you're fine. If you can't, then might I direct you to gimp.org
LOL
LOL! I do promise that! I'm not totally out of touch. ;) tee hee! Great tutorials by the by!
Post a Comment